

An interior design punch list makes a better handover when every finish item is judged against the document that governs it, written so the right trade can find and fix it, closed only after someone rechecks the same item under the recorded conditions, and handed over with the records needed to maintain that finish. A short, precise list is easier to act on than pages of “finish needs attention.”
This walkthrough covers installed finishes and casework: faces, edges, joints, trim, cabinet operation and completion. Building systems and contract sign-off have their own processes. The practical job here is to connect an observed discrepancy to its requirement, correction and verified result.
What does an interior design punch list cover?
An interior design punch list covers visible or operable interior work that is incomplete, damaged or different from the approved result. Include wall finishes, panels, cabinet fronts, hardware operation, trim, junctions and cleaning. Keep the supporting finish records with the work, so the owner can identify and maintain what has been installed.

Walk the room as an arrangement of connected components. A wall panel can look complete from the entrance while a return, corner or trim end remains unfinished. A cabinet front can match the approved sample yet rub against its neighbor when opened. Looking at the face and operating the component answer different questions.
Record defects and omissions against the approved work. The AIA closeout guidance treats owner-requested enhancements as changes to coordinate through the project. If the installed item matches the approved work and the owner now wants something different, describe it as a requested change through the project’s change process.
Keep this list focused on finishes and related operation. Specialist building-system, fire and regulatory checks need their own people and records. A well-organized finish walk helps those responsibilities stay visible without suggesting that checking a cabinet door verifies the room’s other systems.
What must be ready before the walkthrough?
The work must be inspectable and the reference documents must be available before you judge it. Arrange suitable access, working normal lighting and enough cleaning to see the finish. Bring the relevant drawings, finish schedule, approved samples, manufacturer instructions and specified standards, with temporary protection handled according to the product and project instructions.
Use the current approval set. A sample that was superseded during purchasing can make a correct installation appear wrong. Check the identifier and revision against the record used for fabrication, and resolve any conflict before turning it into a defect. Our millwork submittal guide explains those earlier drawings and approval records.
If a covering, residue, missing light or inaccessible area prevents inspection, record “not ready to inspect.” Assign someone to make it ready and a date for returning. A blank field can later be mistaken for acceptance.
Do not remove protection merely to complete a checklist. Its removal and any subsequent cleaning need the appropriate instructions and coordination. Once an area is ready, record the conditions that matter to the review: the room lighting, viewing position and anything that remains incomplete nearby.
Which document decides whether a finish passes?
The project’s agreed requirements decide whether a finish passes. Identify the relevant drawing, finish approval, manufacturer instruction and specified standard or grade for each component before judging it. That gives the observation a clear basis and shows when a discrepancy needs a design decision instead of an immediate correction instruction.
The current finish-carpentry installation standard is ANSI/AWI 0620–2024. Its installation and aesthetic provisions address matters such as manufacturer instructions, hardware operation and cabinet reveals within its scope. Use the standard or grade the project actually specifies; it does not automatically govern every painted, stone, glass, metal or film surface.
| Component | What to look for | How to locate and record it | What decides it |
|---|---|---|---|
| Cabinet doors and drawer fronts | Operation, rubbing, alignment and reveals | Identify the cabinet and moving part; describe the observed operation | Drawings, hardware or manufacturer instructions, and specified grade |
| Visible faces and edges | Finish identity, orientation, chips, scratches, residue, lifting edges or repair mismatch | Name the face or edge and attach a located detail | Approved finish reference and material-specific requirements |
| Wall panels and junctions | Joint consistency, alignment, trim ends, corners and adjoining damage | Mark the elevation, panel and junction | Project details and installation requirements |
| Completion and cleaning | Missing trim or hardware, residue and coverings blocking inspection | Identify the unfinished component or uninspectable area | Contract scope and appropriate product instructions |
| Child-height or high-touch locations | Reachable fronts, edges and corners that need the same finish checks | Identify the actual low-level component | Its project requirements; no extra safety approval is inferred |
This criterion-first table helps avoid a project-wide “looks poor” entry. Where the requirement is unknown, the team needs a decision before assigning a failed result. Where the documents conflict, record the conflict and name the person who must resolve it before deciding what the trade should do.
For cabinet operation and appearance, the aesthetic requirements provide a useful example of requirements tied to a defined installation scope. The checklist applies that approach without inventing a universal gap size, scratch limit or visual tolerance.
How should you look at finishes so lighting doesn’t start an argument?
Separate locating a mark from judging it. A hand light held at a sharp angle may reveal a surface feature, but acceptance follows the agreed material and project criteria. Record the relevant room lighting and viewing positions, then use those conditions again when the same item is rechecked after correction.
Begin with the room’s normal lighting working as intended and the positions from which people use the space. If a feature becomes visible from a particular seat or approach, record that position. The reviewer can then return to the same view instead of arguing over photographs made under unrelated conditions.
Wall washing and wall grazing create different effects on surface relief. A diagnostic light used close to a panel can be useful for locating a feature, while its acceptability still needs the applicable criteria. Agree how the finished material is to be judged before treating a lighting technique as the rule.
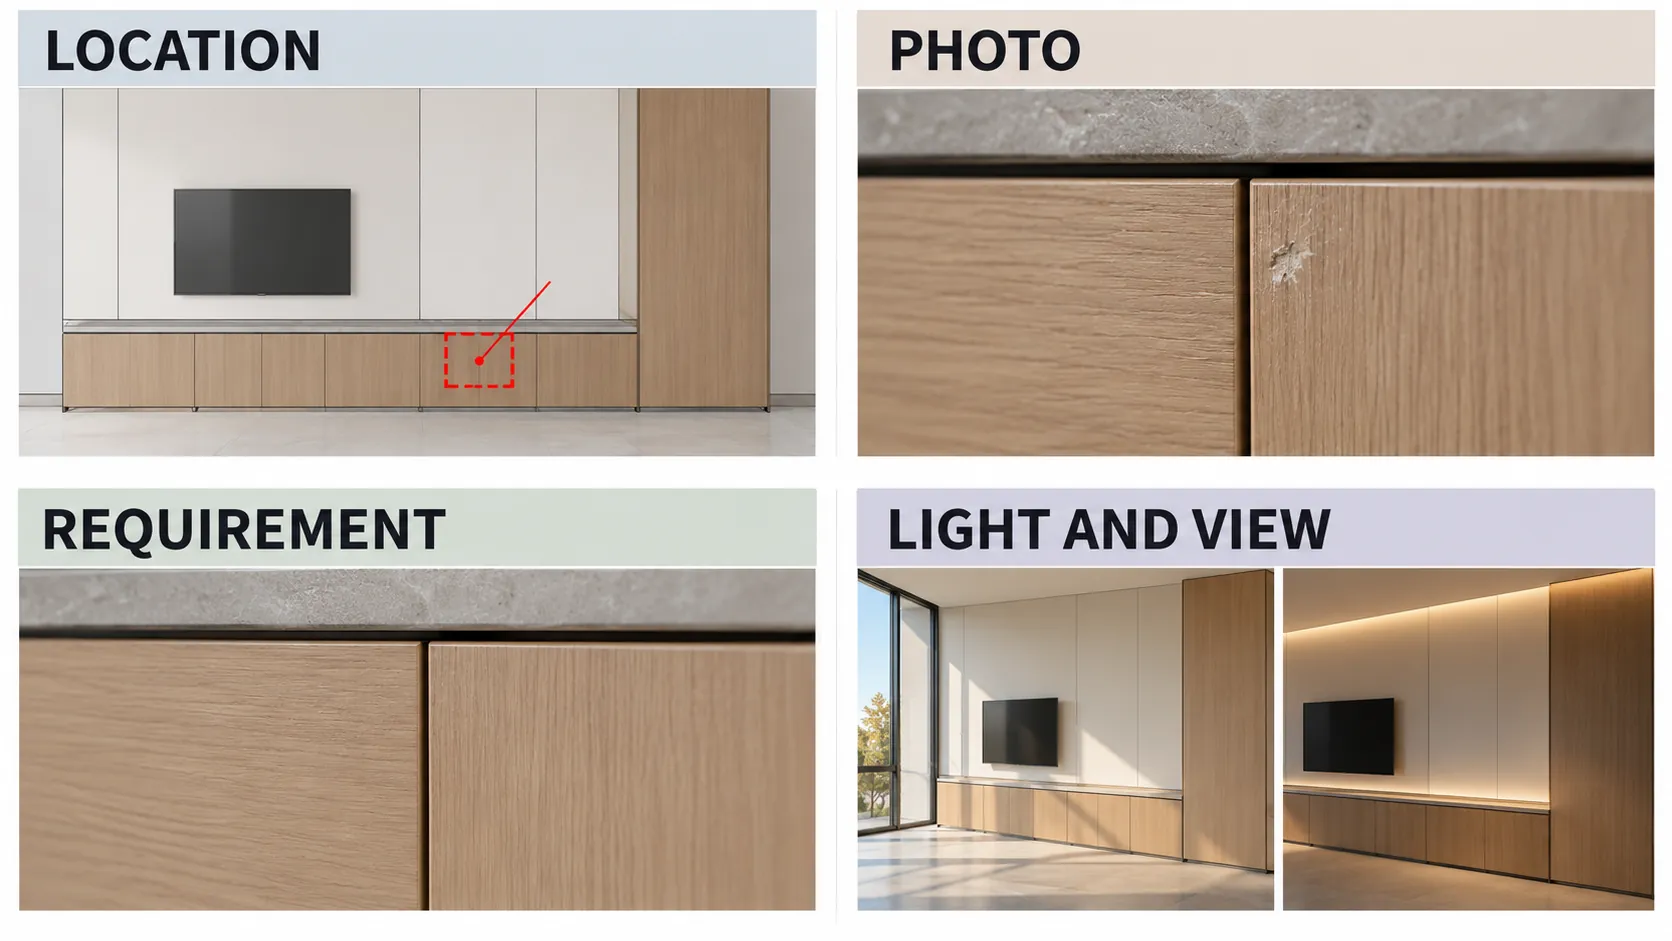
Photograph the general view and the relevant detail, with a note about the light used. A close-up that fills the frame can hide the location and scale of the issue. Keep the wider view linked to it. No blanket viewing distance or light level is established by this checklist.
How do you write a punch item a trade can fix the first time?
Write an item with an exact location, an observable discrepancy, its reference requirement, supporting photos and a correction owner with a target date. Describe what you see before guessing its cause. The assigned trade should be able to find the component and understand the required result without another person retelling the walkthrough.

Location, description, photo and assignment are the basic record. An architect’s account of a punch-list walk shows the practical use of room references, written notes and photographs. The table below illustrates a working entry; it is not a real project or a prescribed form.
| Field | Hypothetical example | Why it matters |
|---|---|---|
| Item ID | Reception-panel-return | Keeps later messages and photos connected |
| Location | Reception, north elevation, panel beside the entrance | Lets the trade find the correct component |
| Observation | Visible residue remains on the panel return | Records the condition without assigning a cause |
| Requirement | Identify the relevant approved finish and completion requirement | Defines the result being checked |
| Photos | Linked overview and detail of that return | Shows both location and the observed condition |
| Correction owner | Name the responsible project contact | Makes the next action accountable |
| Target date | Enter the agreed date | Makes the return visit possible |
| Status | Open, then updated through correction and verification | Preserves the item until the review is complete |
Use one shared list and retain the original entry when the status changes. If a trade needs a decision about the approved result, record that question against the item. For physical marks or tape, obtain finish-specific approval first; a marking method used on another material may be unsuitable here.
Give each observation its own entry. A damaged edge and missing hardware on the same cabinet can have different correction owners or readiness dates, so link both to the same cabinet reference and verify each one separately.
When is a corrected item actually closed?
A corrected item closes when the reviewer designated by the project confirms that same item against the same requirement under the recorded conditions. A report that work is finished starts reinspection; it does not complete it. Check adjoining surfaces too, and keep deferred or disputed items visible with someone responsible for the next decision.
Return to the original item reference, overview and detail. Confirm the correction, then examine the immediately affected edges, joints and adjacent finishes. A repaired face can look satisfactory while new residue or damage beside it remains unresolved. Record the actual result and reviewer instead of replacing the original entry with an unconnected completion photo.
| Working status | Who moves it | Evidence required |
|---|---|---|
| Open | Walkthrough reviewer | Located observation and its reference requirement |
| Assigned | Project coordinator | Correction owner and target date |
| Reported corrected | Assigned contact | Description of the work reported complete |
| Ready for reinspection | Coordinator and required reviewer | Access, lighting and other inspection conditions restored |
| Verified closed | Reviewer designated for the project | Same-item check, result, reviewer and date |
| Deferred or disputed | Named decision owner | Reason, next decision or action, and review date |
These are proposed working labels. The WBDG commissioning-document guidance describes retaining issue and resolution information; that logging principle is useful here, although a finish walk is not building commissioning.
The disappearance of a tape mark, an email saying “done,” or an uploaded photograph should leave the item in the appropriate reported or review state until the designated verification occurs. If the requirement or conditions change, record the change so the later result can still be understood.
What should you record for silicone-faced film surfaces on the list?
For a surface faced with Puremorfilm decorative film, keep the approved color or texture reference and supplier contact beside the installed location. The film has a silicone functional surface for furniture and walls. We supply mainly rolls for PUR flat lamination onto panels; record the panel or furniture maker responsible for that fabrication.

Our furniture decorative film is a paint-free material with a silicone functional face, distinct from PVC, melamine, PP and PETG decorative faces. The silicone surface is inherently flame-retardant, with higher grades up to UL 94 V-0 available on request. In the manufacturer’s laboratory tests, coffee, red wine and soy sauce left at 25°C for 24 hours wiped off with no obvious change. We use a No DOP formulation. Samples are free.
Film test results describe the film, not acceptance of the installed panel, cabinet or room. The material has a leather-like feel and some elasticity, so it is not for floors, stovetop counters, shower floors or walked-on areas.
Is the finish list ready to close and hand over?
The finish list is ready for handover when each item has a verified result or an explicit deferred status with an owner and date, and the relevant finish records are available. Keep outstanding decisions visible. Physical list closure and the wider project’s completion requirements have different scopes, so track the remaining deliverables separately.
The distinction between substantial and final completion explains why a punch list is only part of closeout. Removing every listed mark does not resolve other nonconforming work or supply missing handover information automatically. Follow the project’s agreed responsibilities for its broader completion review.
Before closing the finish record, check that:
- Each item is verified closed, or deferred or disputed with a decision owner and date.
- The original observations, requirements and inspection conditions remain available.
- Corrected items retain their reviewer, date and result, including affected adjoining surfaces.
- Each finish has its approved identity or reference and the supplier’s relevant care information.
- Required product, warranty and contact records are filed, with missing records assigned for follow-up.
- Other contract deliverables remain tracked through the appropriate project process.
Keep the approved material reference tied to the installed location. A sample without its identity is difficult to use when a later repair or replacement needs an appearance comparison. That link also helps facilities staff locate the right contact without reopening the entire approval history.
To request a reference sample or discuss which records to retain for a film-faced surface, contact us with the finish location and approved reference.
Frequently Asked Questions
What Is a Punch List in Construction?
A punch list is a record of work that needs finishing or correction during project closeout. It identifies the remaining items and supports assignment, correction and review; the full project can also have deliverables outside that list.
When Are Punch Lists Created?
Punch lists are usually created near substantial completion, and larger projects may keep rolling lists by area or phase. For an interior finish review, walk each area when access, lighting and surface condition make it possible to inspect the work meaningfully.
Who uses Construction Punch Lists?
Owners, designers or architects, general contractors, trades and relevant facilities staff use construction punch lists. The project agreement and professional scopes determine who identifies, corrects and verifies particular items.
How do you create an effective punch list?
Create a shared record with a precise location, observed discrepancy, reference requirement, useful photos, correction owner and date. Keep each original item connected to the correction and the designated reviewer’s closure result.
What are other names for a punch list?
A punch list may also be called a snag list, deficiency list, punch-out list or completion list. Confirm the term and process used on your project so everyone works from the same record.