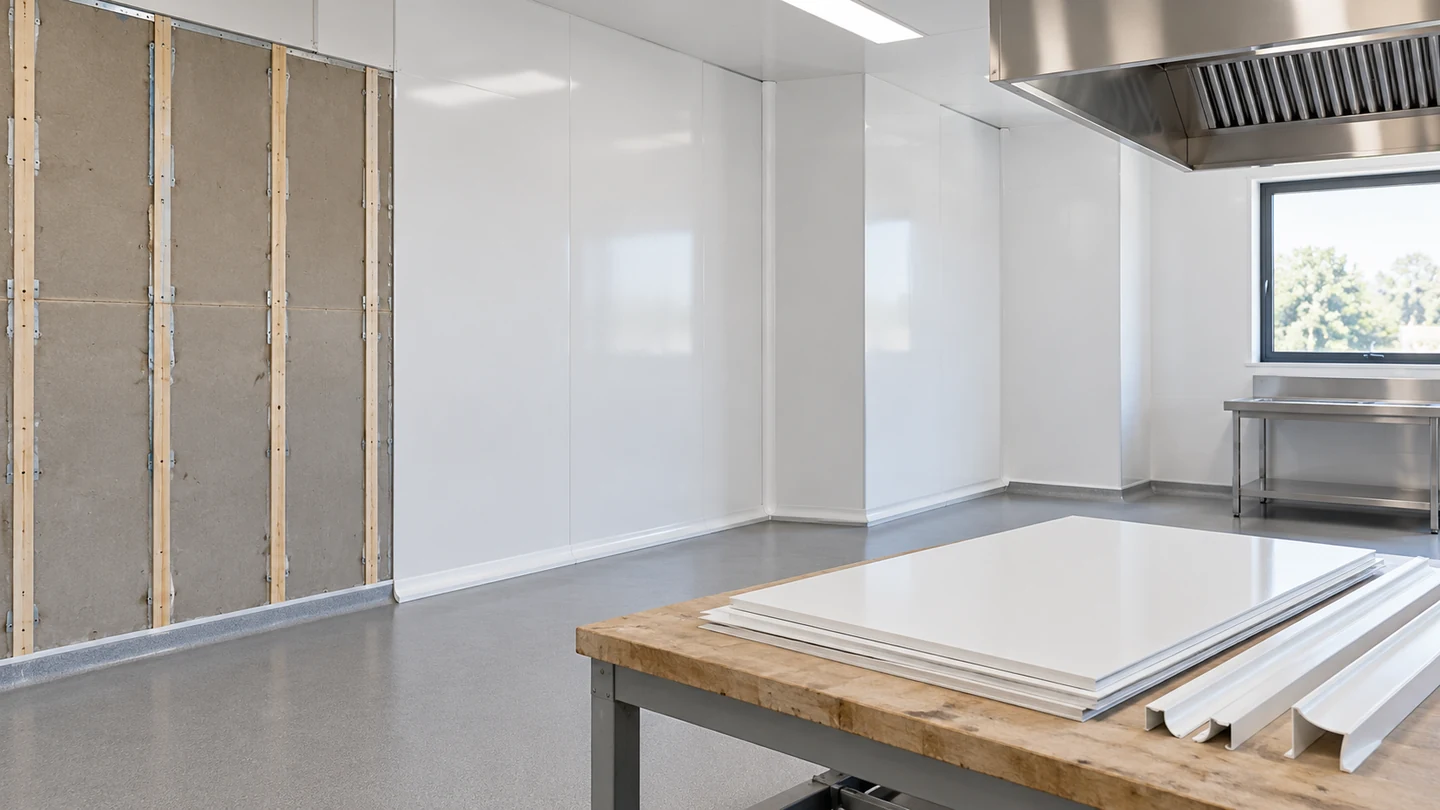
Hygienic wall cladding installation starts with a sound, dry, clean and flat wall, uses the chosen system’s adhesive and fixings to hold the sheets, and closes the joints and floor junction so the wall is easy to clean. Allow for curing before the room returns to service: one PVC/GRP wall-cladding adhesive lists approximately 36–48 hours to complete cure, although that product’s data table leaves the reference temperature and humidity unstated.
A new sheet can hide an uneven wall and still sit on a poor bond. So work in order: substrate, layout, bonding, then the junctions, because the cleanable face is only one part of the finished wall.
What does hygienic wall cladding installation involve?
It involves preparing the wall, fitting rigid cleanable sheets, securing them with the selected bonding or fixing system, and closing the joints, corners and penetrations. Smooth, nonporous faces make wiping easier; careful junctions stop the finished wall from becoming a collection of dirt traps.
The FDA’s 2026 Food Code is a model for government adoption. It calls for smooth, durable, easily cleanable surfaces in the relevant indoor operational areas, and nonabsorbent surfaces where moisture is present. The edition your local health authority has adopted is the one that applies to a given food business.
In a commercial kitchen, plan the wall with the floor, sinks and service openings before ordering sheets. A surface that wipes clean in the middle still needs accessible, closed junctions around a wash station. A clinic or school bathroom needs the same attention to cleaning access, using the assembly appropriate to that building.
The decorative wall surfaces overview covers the appearance choices. The wall panel materials comparison helps distinguish the rigid panel from the face attached to it.
Can hygienic cladding go over an existing wall?
Yes, when the wall is sound, dry and flat and its existing finish is firmly attached. Loose paint, wallpaper, moving tiles or damaged board need treatment before the new sheet can have a dependable support.
An adhesive bonded to paint is relying on that paint’s grip on the wall. Pressing a sheet firmly against a peeling layer simply creates a large panel attached to something already failing. WallPro’s existing-wall guidance makes this substrate assessment the starting point for a retrofit.
| Existing condition | Installation route | Work before fitting |
|---|---|---|
| Firm paint on a sound wall | Retain if compatible with the chosen adhesive | Clean and assess adhesion and flatness |
| Well-attached tiles | Retain where the system permits | Remove contamination and address uneven joints |
| Sound plasterboard or blockwork | Prepare and bond with the matched system | Repair defects and treat absorbency as specified |
| Local flaking or shallow unevenness | Repair first | Remove loose material and restore a sound plane |
| Wet, moldy or structurally damaged substrate | Investigate and remediate first | Fix the moisture source; replace material that cannot be restored |
A local defect can sometimes be repaired, while persistent damage may require replacement. In an operating kitchen, examine the areas behind sinks and at the floor carefully before agreeing to cover the entire wall. The PVC wall panel pros and cons explain the maintenance tradeoffs after installation.
How do you prepare the wall before fixing the sheets?
Fix leaks and remove mold first, restore a flat support, clean off dirt and grease, and let the substrate dry before enclosing it. Bring the sheets and adhesive into the conditions required for the selected installation system.
The EPA’s mold cleanup guidance puts moisture correction and drying ahead of painting or caulking. Moldy porous material may need removal because contamination can extend into it. Covering the stain with a clean new face leaves that underlying problem in place.
Next, remove high points and fill low areas with a preparation material compatible with the wall and adhesive. Clean dust and grease off the actual bonding surface. A glossy tile, absorbent block and repaired plasterboard can require different preparation, so identify the substrate before choosing a primer or sealer.
For a small catering-room retrofit, a useful sequence is to complete wet repairs, allow drying, check the repaired plane, and only then bring in cut sheets for fitting. This avoids using expensive cladding as the straightedge for an unfinished wall. Judge readiness by the wall’s condition and the materials’ instructions, not by a fixed number of days.
How do you set out, cut and fit the first sheets?
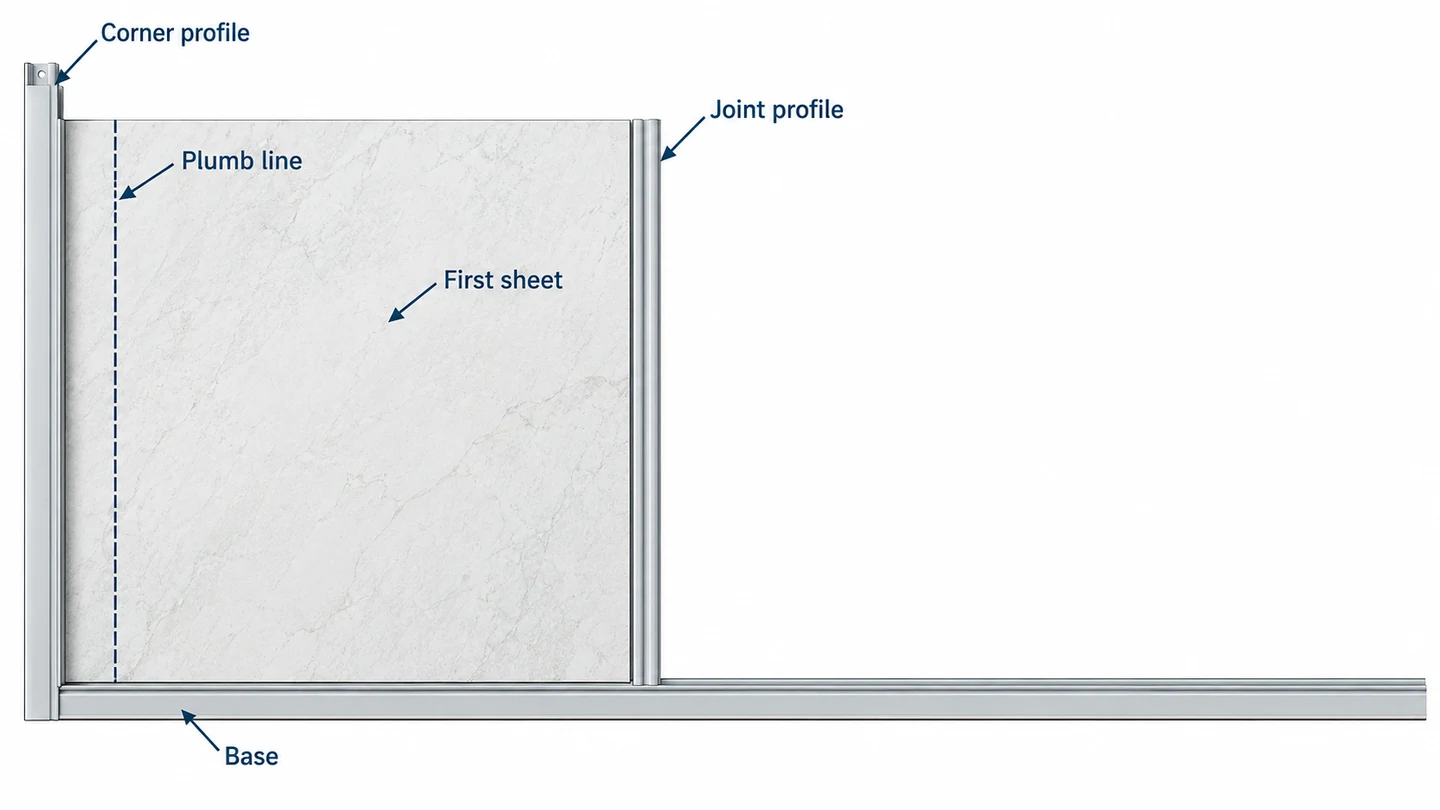
Establish a plumb starting line, plan the corner and base details, then dry-fit the first sheet and its joint profile before bonding. The first sheet controls how every following joint meets doors, sinks and the end of the wall.
Measure the wall at several positions and mark service openings on the sheet before cutting. Check which face and edge enter each profile. Following the chosen profile sequence matters around corners: some trims have to be positioned before a sheet goes against the wall.
For PVC sheets, use a suitable fine-tooth cutting tool, controlled feed and careful drilling. Clear swarf so it cannot scratch the face or accumulate around a hot cutting edge. Support the sheet as you work to keep a corner or narrow cutout from flexing and cracking.
Leave the movement allowance specified for the selected sheet and trim system. Then check the dry fit again around an outlet or pipe penetration, where a small measurement error can become visible after bonding. Electrical and plumbing alterations belong with the appropriate trades; coordinate their finished positions before closing the wall.
Which adhesive holds the sheets, and how long does it cure?
Use the adhesive matched to the panel and substrate, apply its specified bead or trowel pattern, and press the sheet into contact as directed. Skin formation, working time and full cure describe different stages, so use the correct one when scheduling the work.
As a named example, Ureka Cladstikk 12’s January 2023 technical sheet describes a hybrid MS polymer adhesive for PVC and GRP hygienic cladding. Its application uses the specified multiiiibead G2 gun with the sheet laid flat, followed by pressure with a roller after positioning. A 1.5 L pack covers approximately 3 m² when applied as directed.
| Timing term | What it tells the installer | Cladstikk 12 example |
|---|---|---|
| Pot life, for a mixed system | How long a prepared mixture remains usable under the stated conditions | Follow the relevant mixed-adhesive data |
| Skin formation | When an exposed surface skin forms | Approximately 50 minutes |
| Cure rate | The speed of curing through the adhesive | 2–3 mm per 24 hours |
| Complete cure | The stated stage of completed curing | 36–48 hours |
The table does not state the temperature, humidity or bead thickness behind those figures, so treat them as that product’s stated values, not a reopening date for your room. Its application limits are 5–40°C, with a substrate temperature of at least 15°C. Both bonding faces must be sound, clean, dry and free of dust and oil; the adhesive must not be thinned or used on bitumen or oil-bleeding substrates.
That product also calls for evaluation and ageing tests under the actual conditions, with renewed assessment when a substrate changes. For a cold storeroom wall, that matters before work starts. A two-part trowel system has its own mixing and working schedule. Factory panel lamination adhesives serve a different bonding operation from installing a sheet on site.
How do you seal joints, corners and the floor junction?
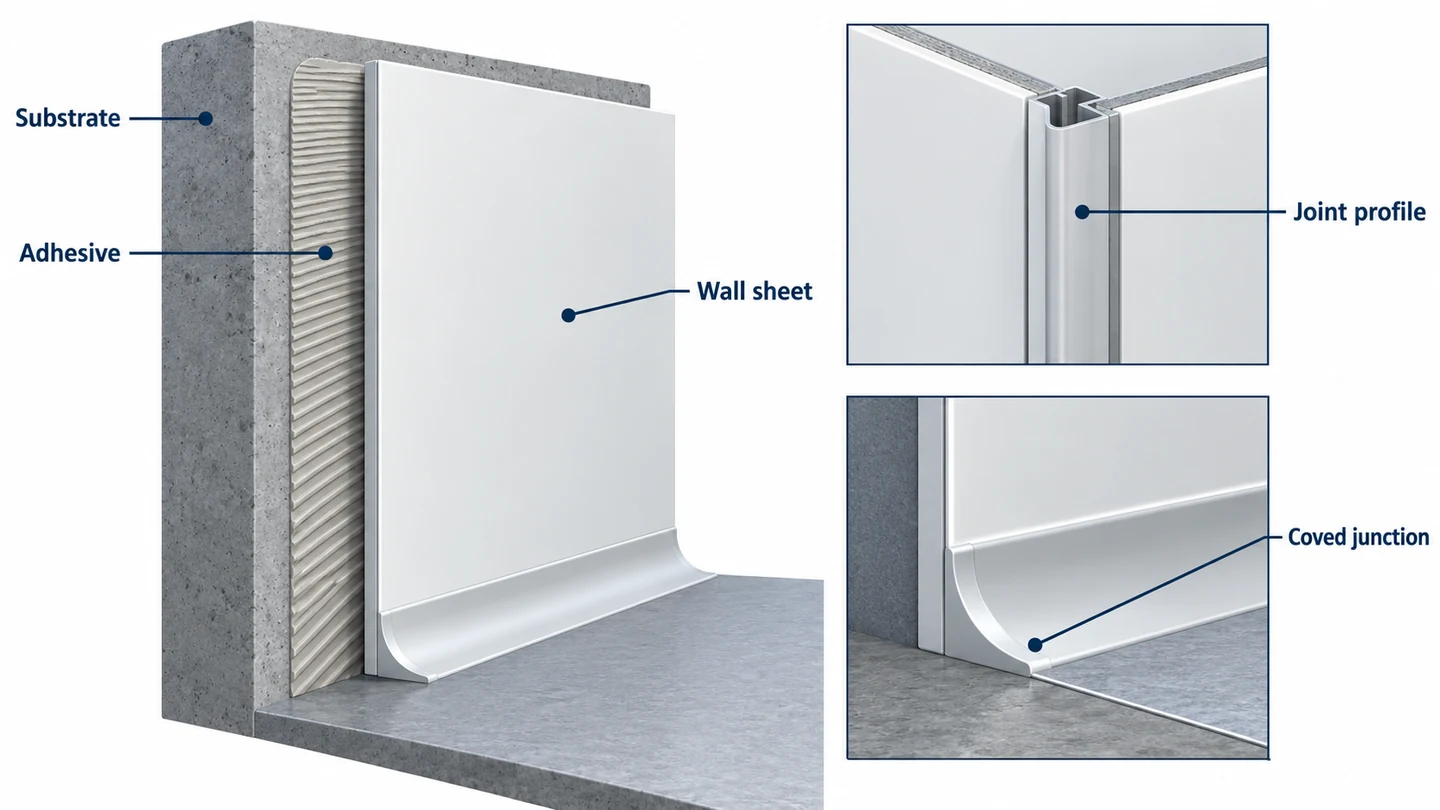
Close joints, internal and external corners, penetrations and floor junctions with the selected assembly’s trims, sealant or welded detail. Choose the detail before fitting the sheets so every edge has a planned termination.
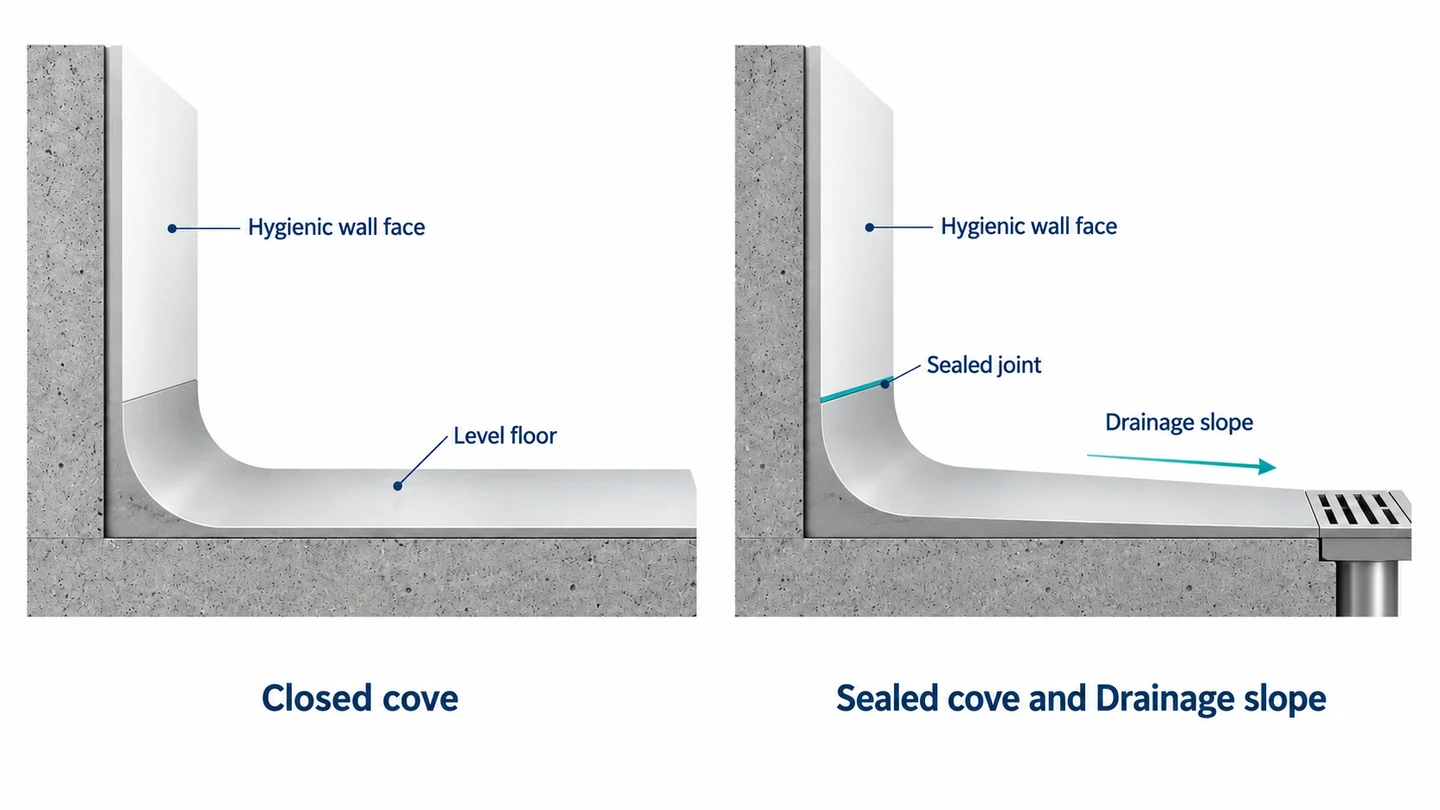
The 2026 model code’s floor-and-wall provision, section 6-201.13, distinguishes two food-premises conditions. Where floors are not water-flushed, the junction is coved and closed to no larger than 1 mm. Where water flushing is used, the floor is drained and graded, and its coved junction with the wall is sealed. That measurement concerns the floor junction, not panel expansion spacing.
At a kitchen wash station, follow the floor finish continuously into its wall termination. A neat sheet ending above an open crevice gives cleaning water somewhere to collect. Around a sink or service pipe, finish the opening so the user can wipe the surrounding face without pushing dirt into an inaccessible edge.
The restaurant wall panel guide discusses choosing surfaces by room zone. Here the installation decision is whether the junction can withstand that zone’s cleaning routine and remain accessible for inspection and maintenance.
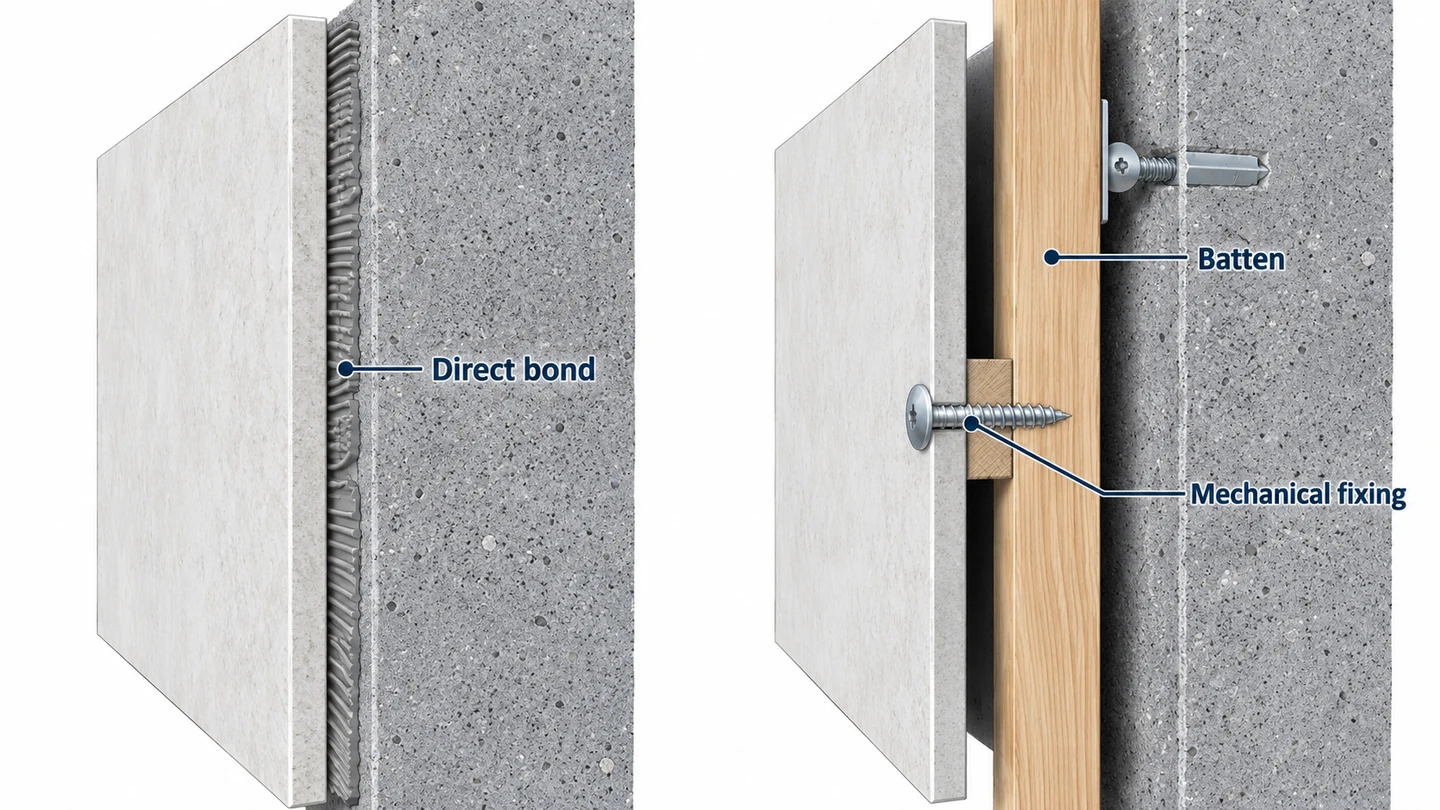
Do you need an air gap behind hygienic cladding?
No, for a directly bonded system designed to sit against a prepared wall. Battened or mechanically fixed cladding is another assembly, with its own support and moisture details.
Some installation guidance uses battens for below-grade or potentially seeping walls, but concealing an active leak still leaves water entering the building. Establish its cause and the appropriate wall construction before deciding how the facing will be supported.
The EPA’s moisture guide recommends drying water-damaged areas and items within 24–48 hours to help prevent mold. That is a moisture-response window, separate from adhesive curing or approval to close a wall.
For a basement utility room, the water source and wall condition come first. For a sound internal kitchen partition, a direct-bonded system may be straightforward. If you are comparing that assembly with tiled wet-room walls, the bathroom panels and tiles comparison covers their maintenance differences.
What should you check before handing over the wall?
Check sheet support, loose edges, joint closures, penetrations and the floor junction, then hand over the cleaning and maintenance instructions for the installed materials. Follow the system manual for protective-film removal and release to service.
Walk the wall while joints and corners remain easy to inspect. Look for lifting at cut edges, uneven seating in profiles and incomplete sealing around fittings. Resolve a poor bond or open junction before equipment blocks access to it. In a kitchen, inspect behind the places likely to receive repeated splashes.
These systems need a sound substrate and careful joints, and damage may require replacing a sheet when the approved repair route cannot restore a cleanable face. Record any permitted repair method with the handover information so later maintenance does not introduce an incompatible patch or sealant.
An installation with closed joints is easier to clean; antimicrobial performance is a separate material claim. Give the operator the actual cleaner restrictions for the face, profiles and sealant, together with the cure and maintenance instructions that apply to this assembly.
Where does a silicone-faced wall panel film fit?
Puremorfilm makes decorative film with a silicone functional face for factory-laminated furniture and wall panels. We supply mainly rolls for PUR flat lamination, with film-faced panels available on request. The silicone face is inherently flame-retardant; higher grades up to UL 94 V-0 are available on request.
In the manufacturer’s laboratory tests, coffee, red wine and other stated stains left at 25°C for 24 hours wiped off with no obvious change. Our formulation is No DOP, and the wall film contains no PVC. The film is for wall and furniture panels, not floors, stovetop counters or shower floors. In worked examples described in the patent application, a 12-hour boiling-water exposure produced no delamination or blistering. Our newer paint-free facing uses silicone functionality, distinct from PVC, melamine, PP and PETG surfaces.
The hygienic wall panel film page covers this factory facing. Site installation belongs to the selected panel assembly; see the application areas when planning a room.
Which installation route suits your wall?
Direct bonding suits a sound prepared wall; defective or wet walls need remediation before a facing, and mechanically fixed designs need their own support details. Plan the floor junction around the way the room will be cleaned.
| Wall or room condition | Practical route |
|---|---|
| Sound retained paint or tiles | Assess compatibility, clean, prepare and use the matched bonding system |
| Local damage or unevenness | Restore a sound, flat support before fitting |
| Moisture-affected or below-grade wall | Resolve the moisture and choose the appropriate assembly |
| New partition | Complete and dry the substrate before installation |
| Water-flushed food area | Coordinate the coved, sealed junction with the drained and graded floor |
For a factory-faced wall-panel finish, contact us with the room’s use, cleaning routine and desired decorative surface.
Frequently Asked Questions
What is hygienic cladding?
Hygienic cladding is a smooth, nonporous, rigid wall covering used to create an easily cleanable surface when its sheets, joints and junctions are properly detailed. The name alone says nothing about antimicrobial performance.
How do you attach cladding to a wall?
With the chosen system’s adhesive, applied in its specified bead or trowel pattern, or with its mechanical fixings, then pressed or secured as directed. Adhesive cure, trim sequence and movement allowance belong to that particular system.
Do you need an air gap behind cladding?
No, for a designed directly bonded installation. Battened constructions have different requirements, and a wet wall needs investigation before either route is selected.
Can hygienic cladding be installed over an existing wall?
Yes, if the existing wall and its finish are dry, sound, flat and suitable for the bonding system. Loose or damaged areas need repair or replacement first.
What are the disadvantages of cladding?
Cladding needs a dependable substrate and carefully finished joints, and a damaged sheet can require replacement when a cleanable repair is unavailable. Access around sinks, corners and fittings also affects how easily it can be maintained.